ADOBE PHOTOSHOP 7 Color Management (I)
As we all know, a typical image replication system includes multiple input and output devices (scanners, monitors, printers, etc.), and each device has its own way of expressing and restoring colors, that is, colors are device-dependent. . This is the reason why a scanned photo image shows different colors on the display, on proofs, or on printed manuscripts. In response to this problem, many software developers at home and abroad have invested in the development of the color management system (CMS). The purpose is to manage the color of the entire copying process of the image to ensure that the appearance of the same image from the input to the display and output is as consistent as possible.
Photoshop is an image processing software developed by Adobe, and it is also a complete color management system. At present, this system is valued by people in the industry in color image processing. In the process of software upgrades, the color management function has also been greatly improved. The following will discuss in detail the Photoshop7 color management process and how to correctly set the software parameters.
First, the calibration and characterization of the display
To make the color the user sees on the screen as close as possible to the color of the output proofs, the display must be calibrated first, and any color workflow begins with the calibration and characterization of the display. The purpose of the calibration is to obtain the best image display environment in order to facilitate the editing of the image. The purpose of the characterization is to obtain the ICC profile of the monitor. Photoshop can use it to optimize the display of the monitor.
Users of Windows systems can calibrate and characterize the monitor by running the Adobe Gamma utility. Users of Mac OS systems can do this through the ColorSync system or the Adobe Gamma utility. This article focuses on monitor calibration and characterization under Windows.
The Adobe Gamma utility is located under "My Computer → Control Panel". Before running Adobe Gamma, it is best to have the monitor turned on for more than half an hour to ensure that the screen display is stable. Close all desktop graphics and set the background color to light gray. To avoid interference with the background color. Adobe Gamma's operating interface is shown in Figure 1. The specific steps are as follows:
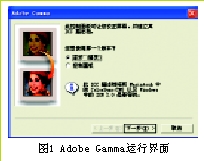
1. Follow the instructions in the introduction and select the "Step by Step (Elves)" method.
2. After clicking the "Load" button, select the monitor's profile file or the closest one.
3. Adjust the brightness of the display after adjusting the contrast to the maximum to make the middle box as dark as possible and keep the frame bright white.
4. For the "Fluorescent Agent" option, select "Custom" if you have a red, green, and blue phosphor value for the display given by the manufacturer; otherwise select the "Trinitron" or "P22-EBU" type display .
5. For setting the gamma of the monitor, first check the single gamma by dragging the slider so that the color of the middle box is the same as the surrounding color. Then check the gamma values ​​of red, green, and blue. The method is the same as above. The gamma setting is 2.2 in Windows and 1.8 in Mac.
6. For the "Hardest Spot" selection, select the monitor's white field according to the monitor manufacturer's instructions to determine whether to use warm or cool colors. If there is no manufacturer's instructions, it is best to choose "6500K". Of course, you can also measure the white field of your monitor.
7. For "the brightest point adjusted", it is best to select the "like hardware" item.
8. In the last step, click "Finish" to save the monitor's profile file.
(to be continued)
Bird Controls,Live Bird Trap,Vaisala Bird Spike Kit,Bird Net
Hebei Liebang Metal Products Co.,Ltd , https://www.lb-animaltraps.com